Skip to content
Clear and effective communication with your pattern maker is one of the most critical steps in garment development. Even the smallest misunderstanding during the revision stage can lead to costly delays, inaccurate samples, wasted materials, and frustration on both sides. Whether you’re a startup fashion brand or an established apparel company, knowing how to communicate revisions to your pattern maker can significantly improve fit accuracy, production efficiency, and final product quality.
In this guide, we’ll break down best practices, common mistakes to avoid, and professional tips to ensure your pattern revisions are understood and executed correctly.
Why Clear Pattern Revision Communication Matters
Pattern makers translate your design vision into technical reality. During sampling, revisions are inevitable—adjusting fit, proportions, or construction details is part of the process. However, vague or inconsistent feedback can result in:
Incorrect garment fit
Repeated sampling rounds
Increased development costs
Delayed production timelines
Strained relationships with manufacturers
Clear communication saves time, money, and ensures your garment meets market expectations.
1. Start with a Clear Fit Objective
Before sending any revisions, define what you want to achieve with the changes. Ask yourself:
Is the issue comfort, silhouette, or sizing?
Are you targeting a specific customer body type?
Is this a style preference or a technical necessity?
For example, instead of saying:
“The waist feels off.”
Say:
“The waist feels too tight when sitting; please add 2 cm ease to the waist circumference.”
2. Always Reference the Sample and Size Clearly
One of the most common mistakes is failing to specify which sample and size the revision applies to.
Always include:
Sample stage (Proto / Fit Sample / SMS / PPS)
Sample number (if applicable)
Size being reviewed (e.g., EU 36, M, base size)
Example:
“For the Fit Sample #2, size M, the sleeve length is 1.5 cm too long.”
This avoids confusion, especially when multiple samples or sizes are in development.

3. Use Visual Markups and Annotations
A picture truly is worth a thousand words—especially in garment development.
Best visual tools:
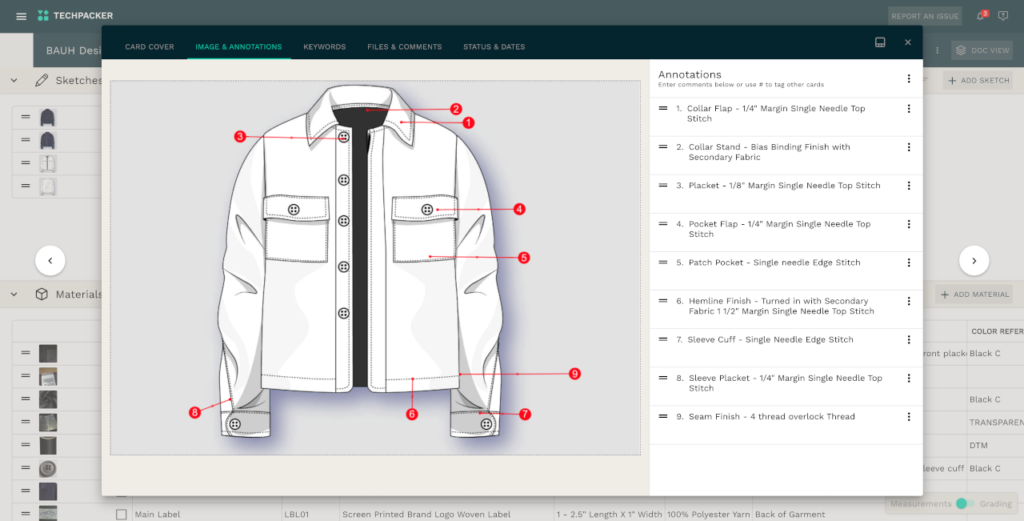
Annotated photos of the sample worn on a model
Tech pack sketches with highlighted areas
Screenshots with arrows and notes
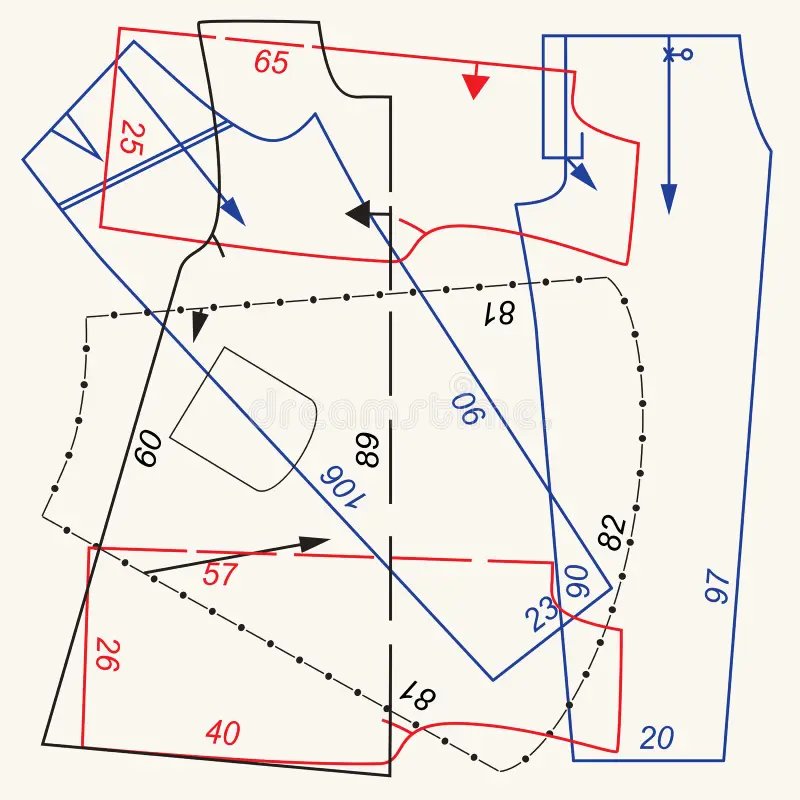
Measurement diagrams
Mark the exact area that needs revision and add concise notes such as:
“Reduce width”
“Add length”
“Move seam up 1 cm”
📌 Avoid sending plain photos with no explanation—pattern makers should not have to guess what the issue is.
4. Be Specific with Measurements and Numbers
Pattern makers work with numbers, not feelings. Replace subjective terms with quantifiable instructions.
❌ Vague feedback:
“Sleeves are too big”
“Neckline looks weird”
“Fit is not flattering”
✅ Clear revision instructions:
“Reduce sleeve bicep width by 2 cm”
“Lower neckline by 1 cm at CF”
“Increase hip ease by 3 cm total”
If you’re unsure of exact measurements, ask your manufacturer to propose adjustments based on your concern.
5. Separate Fit Issues from Design Changes
To avoid confusion, organize your feedback into clear sections:
Fit revisions (length, width, ease)
Pattern corrections (seam alignment, balance)
Design changes (style lines, details)
Construction issues (puckering, pulling, twisting)
Example format:
Fit:
– Add 1 cm length to front bodice
– Reduce shoulder width by 0.5 cm each sideConstruction:
– Armhole pulling, please adjust sleeve cap
This structured approach makes it easier for pattern makers to process and implement changes accurately.
6. Keep One Revision List per Round
Sending multiple messages with scattered feedback is a recipe for mistakes.
Best practice:
Collect all comments
Review internally
Send one consolidated revision list
This ensures:
No conflicting instructions
No missed details
A smoother revision workflow
If changes evolve after sending feedback, clearly label them as “Additional comments – please confirm”.
7. Use Simple, Professional Language
Even when working with experienced pattern makers, language barriers can exist—especially in international manufacturing.
Tips for effective communication:
Use short, direct sentences
Avoid slang or overly emotional language
Stick to technical terms where possible
Be polite and collaborative
Example:
“Please advise if this adjustment affects grading or fabric consumption.”
This shows respect for the pattern maker’s expertise and encourages professional dialogue.

8. Confirm Understanding Before Moving Forward
After sending revisions, always ask for confirmation:
Do they understand the changes?
Do they agree with the proposed solution?
Will the revision affect cost or timeline?
A simple follow-up like:
“Please confirm if all revisions are clear before proceeding with the next sample.”
This small step can prevent costly misinterpretations.
9. Document Everything for Future Reference
Save all revision notes, emails, annotated images, and measurement changes. Proper documentation helps with:
Future reorders
Size grading
Production troubleshooting
Onboarding new team members
Well-documented revisions also make your brand appear more professional and reliable to manufacturers.
10. Build a Long-Term Collaborative Relationship
Remember: pattern makers are not just executors—they are technical partners. Respectful communication, realistic expectations, and clear feedback foster better results over time.
Brands that communicate revisions well often benefit from:
Faster development cycles
Fewer sampling rounds
Better fit consistency
Stronger factory relationships
Final Thoughts
Learning how to communicate revisions to your pattern maker is a skill that pays off throughout the entire garment production process. By being clear, specific, visual, and organized, you reduce errors, save costs, and bring your designs to market faster and more accurately.
Strong communication doesn’t just improve samples—it builds trust, efficiency, and long-term success in the fashion supply chain.